Tutorial para capas de pano em 6" polegadas (em ingles)
Galera achei esse tutorial na net e achei ele bem legal e resolvi postar aqui
Mooslug’s Cloth Cape Tutorial
By
themanintheanthill
– April 26, 2013Posted in: Custom Spotlight, Customizing, Editors’ Picks, Featured, How-To Guides
The Man in the Ant Hill here. With all of the new articles, columns, and posts made at the Fwoosh on a daily basis, it’s easy to miss some things. I just happened to be in the Custom Shop Talk thread when I stumbled across this post by new Fwoosher Mooslug on how to make kick-ass cloth capes for your action figures. Soft-goods mods are nothing new to customs, but if you’ve never done one or are looking for a new approach, this article may have something to offer. Check it out one time, won’t you?
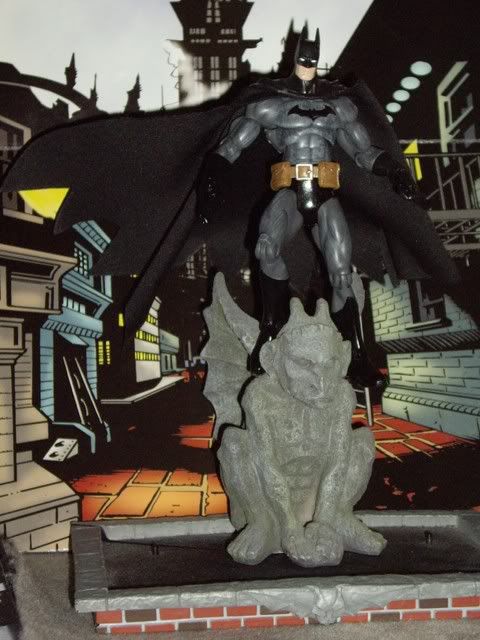
There was a request for more info on the way that the cloth cape on this custom Batman was done… So here’s a long-winded mini tutorial

First off, the fabric: I am not sure what the proper name for it is, but I used a synthetic knit fabric that is sueded on one side and very thin. Being a knit is important so that the fabric will not fray (best to avoid needing to hem it- stitching adds bulk and hurts the scale look. Also I am terrible at sewing ). The thinness is important so that the cape will drape more realistically. The thicker it is, the weirder it will look. For example:

The navy blue cape is made from the same type of fabric as the regular blue one, but it’s just slightly thicker. You can see the difference in the way that it drapes- the stiffer dark blue does not fold as well and sticks out at odd angles. It may depend on the look you are going for – a thicker material might work better for action poses. I wish I knew what the actual name of this fabric is, but it came from the fabric store’s scrap bin 5 years ago.
If using a DCUC figure, completely remove the PVC cape by cutting it at the back peg. If a DCSH, cut off the cape at the shoulders and shave down the neck piece so that there’s a smooth transition to the shoulders:
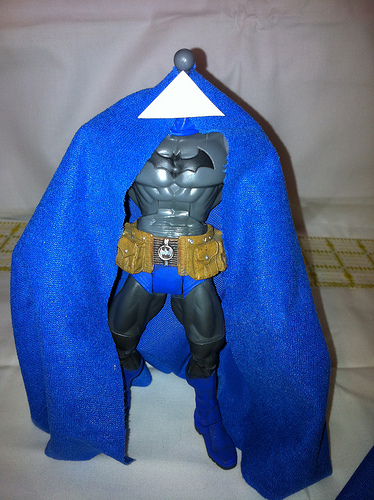
So, once you have your fabric, you’ll need to cut a half circle from it. For a DCUC figure you’d want between a 6-6.5” radius to get the right length. The finished figure at top used about a 6″ radius and the photo below shows a 6.5” radius- slightly long now but it should be okay once the scallops are cut out:

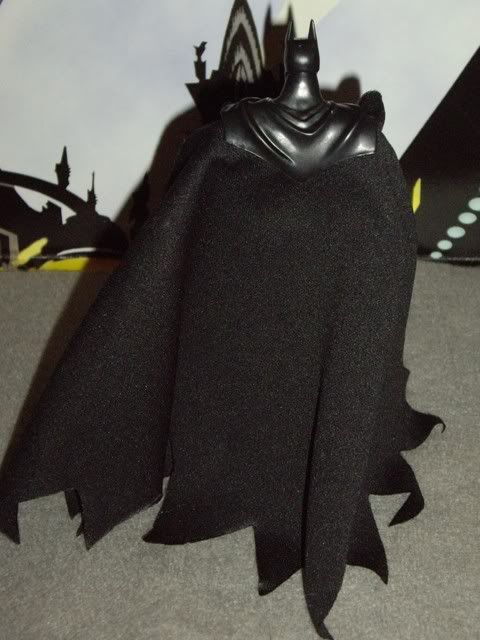
At the center of the half circle, cut a small notch just big enough for the neck peg. The key to this fabric cape is making it cover the neck completely so that the cowl flows into the cape smoothly with a minimal gap. Wrap it up and over the neck as in the photo above.
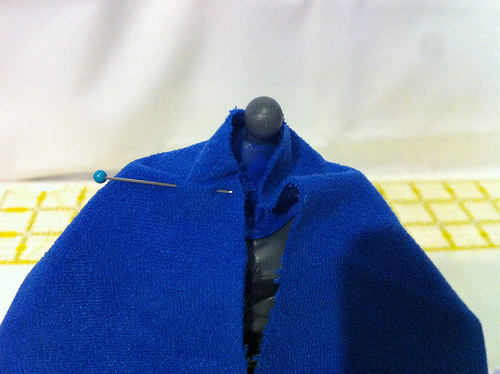
Then cut a small triangle of fabric that will act to close the neck seam between the left and right sides. This goes on the inside of the cape– you can see the size and placement of this triangle here:
The triangle will be attached with Heat N Bond iron-on adhesive.

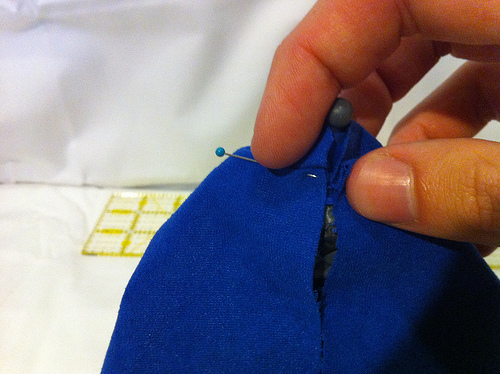
This stuff is really easy to work with. Because it’s not sticky when cool, you can cut precise sizes of adhesive for tiny parts. Here’s an inside-out view of the cape showing the triangle holding the seam shut:

If you want the cape to be open a bit to show the chest logo, then you’re done. If you want it to close completely, you can do the next few steps.
(pretend that in the photos, the neck triangle is already in place).
To finish fitting the cape so that it closes in the front, you pinch up some of the cape just under the neck. Fold it up so that the edge of the cape hangs vertically (left side of photo):
Make the fold level at the top so that it will mimic the shape of a collarbone after it is glued down (see the right side above for the shape of the fold). These folds are secured with tiny little triangles of Heat N Bond, on the fuzzy/outside face of the cape. The final step is to add a little rectangular strip of fabric with adhesive on both sides to the inside of the ‘collarbone’ shapes to hold that seam shut as you did earlier with the triangle:

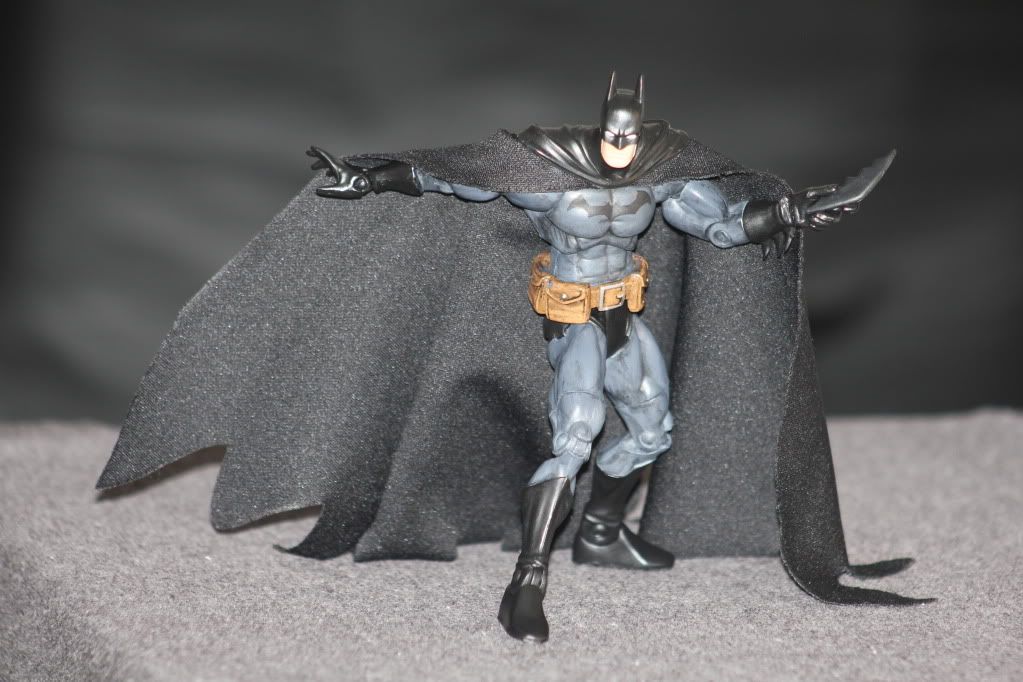
Then just cut your scallops and use an iron to add the creases/peaks to the cape. I only gave DCSH Batman 9 points, like a real bat. The JLI era Batman was drawn with a lot more so I tried that on the other figure. Don’t iron all the way up to the neck- just up to the level of the shoulders is enough. Use a protractor to measure consistent angles:
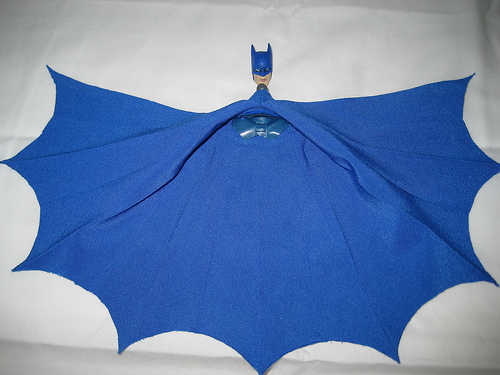
The creases can also help reinforce the cape for ‘spread the cape and intimidate the criminals’ type poses

I hope this is useful and explains what I did well enough. Let me know if you have any questions!
Mooslug’s Cloth Cape Tutorial
By
themanintheanthill
– April 26, 2013Posted in: Custom Spotlight, Customizing, Editors’ Picks, Featured, How-To Guides
The Man in the Ant Hill here. With all of the new articles, columns, and posts made at the Fwoosh on a daily basis, it’s easy to miss some things. I just happened to be in the Custom Shop Talk thread when I stumbled across this post by new Fwoosher Mooslug on how to make kick-ass cloth capes for your action figures. Soft-goods mods are nothing new to customs, but if you’ve never done one or are looking for a new approach, this article may have something to offer. Check it out one time, won’t you?
There was a request for more info on the way that the cloth cape on this custom Batman was done… So here’s a long-winded mini tutorial
First off, the fabric: I am not sure what the proper name for it is, but I used a synthetic knit fabric that is sueded on one side and very thin. Being a knit is important so that the fabric will not fray (best to avoid needing to hem it- stitching adds bulk and hurts the scale look. Also I am terrible at sewing
The navy blue cape is made from the same type of fabric as the regular blue one, but it’s just slightly thicker. You can see the difference in the way that it drapes- the stiffer dark blue does not fold as well and sticks out at odd angles. It may depend on the look you are going for – a thicker material might work better for action poses. I wish I knew what the actual name of this fabric is, but it came from the fabric store’s scrap bin 5 years ago.
If using a DCUC figure, completely remove the PVC cape by cutting it at the back peg. If a DCSH, cut off the cape at the shoulders and shave down the neck piece so that there’s a smooth transition to the shoulders:
So, once you have your fabric, you’ll need to cut a half circle from it. For a DCUC figure you’d want between a 6-6.5” radius to get the right length. The finished figure at top used about a 6″ radius and the photo below shows a 6.5” radius- slightly long now but it should be okay once the scallops are cut out:
At the center of the half circle, cut a small notch just big enough for the neck peg. The key to this fabric cape is making it cover the neck completely so that the cowl flows into the cape smoothly with a minimal gap. Wrap it up and over the neck as in the photo above.
Then cut a small triangle of fabric that will act to close the neck seam between the left and right sides. This goes on the inside of the cape– you can see the size and placement of this triangle here:
The triangle will be attached with Heat N Bond iron-on adhesive.
This stuff is really easy to work with. Because it’s not sticky when cool, you can cut precise sizes of adhesive for tiny parts. Here’s an inside-out view of the cape showing the triangle holding the seam shut:
If you want the cape to be open a bit to show the chest logo, then you’re done. If you want it to close completely, you can do the next few steps.
(pretend that in the photos, the neck triangle is already in place).
To finish fitting the cape so that it closes in the front, you pinch up some of the cape just under the neck. Fold it up so that the edge of the cape hangs vertically (left side of photo):
Make the fold level at the top so that it will mimic the shape of a collarbone after it is glued down (see the right side above for the shape of the fold). These folds are secured with tiny little triangles of Heat N Bond, on the fuzzy/outside face of the cape. The final step is to add a little rectangular strip of fabric with adhesive on both sides to the inside of the ‘collarbone’ shapes to hold that seam shut as you did earlier with the triangle:
Then just cut your scallops and use an iron to add the creases/peaks to the cape. I only gave DCSH Batman 9 points, like a real bat. The JLI era Batman was drawn with a lot more so I tried that on the other figure. Don’t iron all the way up to the neck- just up to the level of the shoulders is enough. Use a protractor to measure consistent angles:
The creases can also help reinforce the cape for ‘spread the cape and intimidate the criminals’ type poses
I hope this is useful and explains what I did well enough. Let me know if you have any questions!